(Project) Infinite Scroll
學習到的知識點
CSS
- position: absolute
- position: fixed
- :nth-of-type(2)
JS
- async function 同步非同步
- await function
- promise
- jQuery.each()
- indexOf()
- scrollTop,clientHeight,scrollHeight 畫面寬高換算
- :contains() Selector
簡介
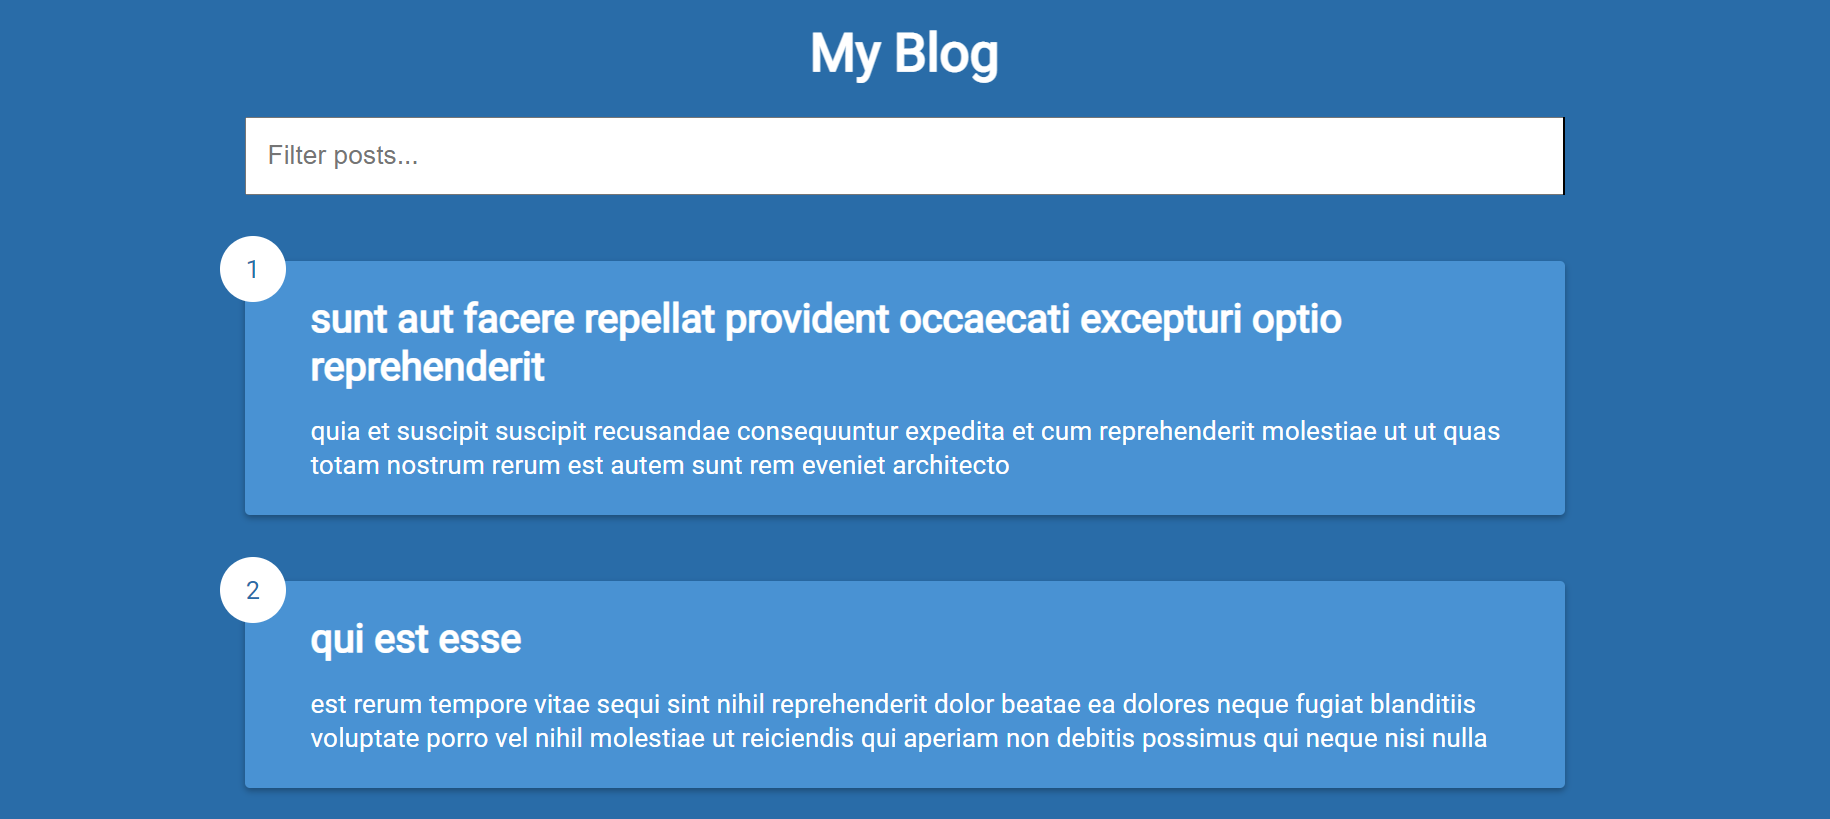
滾動到畫面底部時,會不停出現文章。
HTML
結構
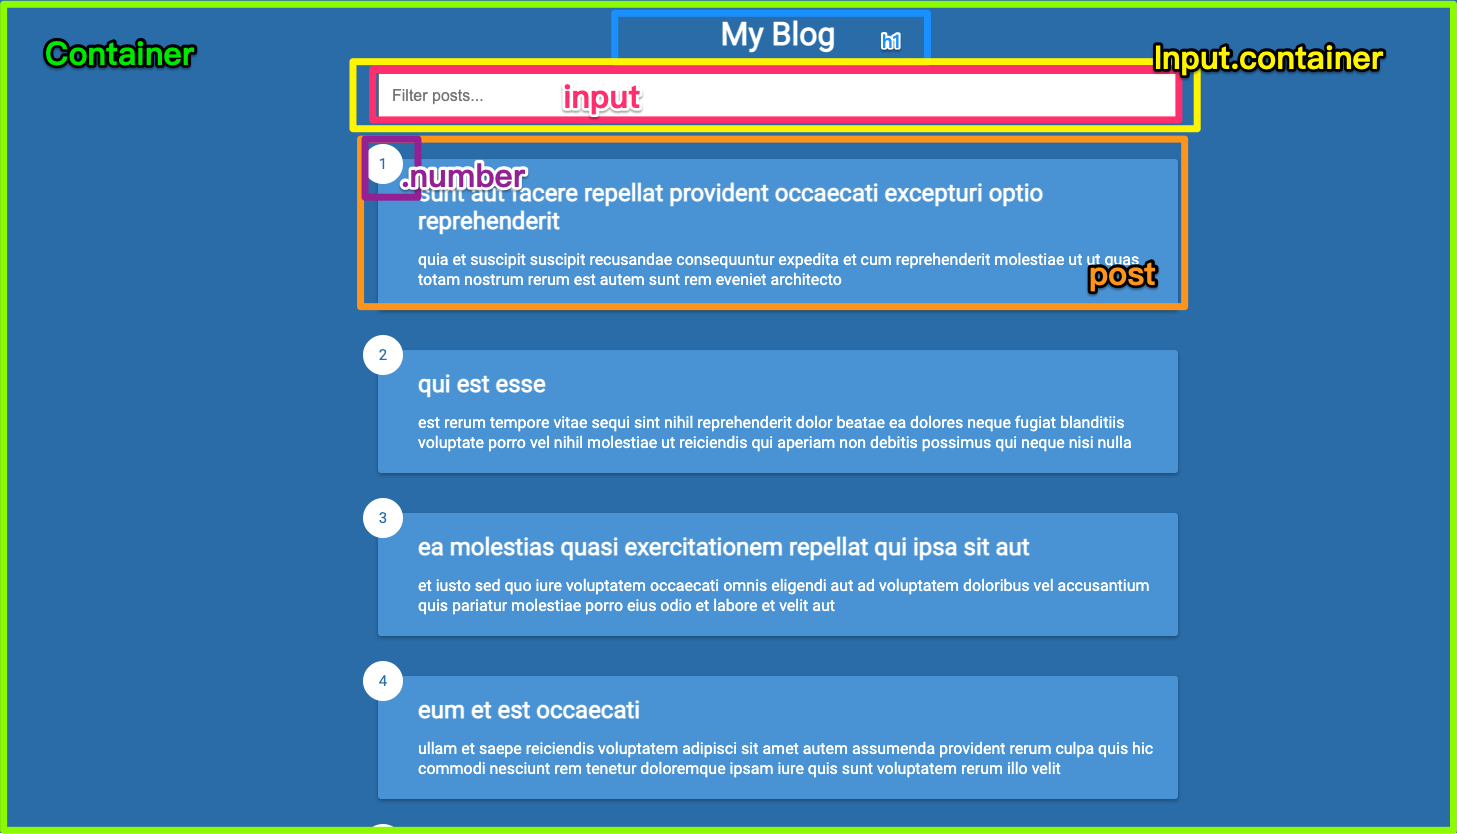
    // 頁面首頁
    <h1>My Blog</h1>

    // 填入資料區塊
    <div class="filter-container">
      <input
        type="text"
        id="filter"
        class="filter"
        placeholder="Filter posts..."
      />
    </div>

    // 貼文區塊
<div id="post-container">

    // 貼文 01
      <div class="post">
        <div class="number">1</div>
        <div class="post-info">
          <h2 class="post-title">Post One</h2>
          <p class="post-body">
            Lorem ipsum dolor sit amet consectetur adipisicing elit. Ducimus
            veniam quas exercitationem repudiandae, molestiae quisquam dolorem
            totam ipsam accusantium aliquam atque eos eveniet accusamus minima
            odit quidem ipsa? Deserunt, corporis.
          </p>
        </div>
      </div>

    // 貼文 02
      <div class="post">
        <div class="number">2</div>
        <div class="post-info">
          <h2 class="post-title">Post Two</h2>
          <p class="post-body">
            Lorem ipsum dolor sit amet consectetur adipisicing elit. Ducimus
            veniam quas exercitationem repudiandae, molestiae quisquam dolorem
            totam ipsam accusantium aliquam atque eos eveniet accusamus minima
            odit quidem ipsa? Deserunt, corporis.
          </p>
        </div>
      </div>

     // 貼文 03
      <div class="post">
        <div class="number">3</div>
        <div class="post-info">
          <h2 class="post-title">Post Three</h2>
          <p class="post-body">
            Lorem ipsum dolor sit amet consectetur adipisicing elit. Ducimus
            veniam quas exercitationem repudiandae, molestiae quisquam dolorem
            totam ipsam accusantium aliquam atque eos eveniet accusamus minima
            odit quidem ipsa? Deserunt, corporis.
          </p>
        </div>
      </div>
    </div>
Loading 動畫區塊

 <div class="loader">
      <div class="circle"></div>
      <div class="circle"></div>
      <div class="circle"></div>
    </div>
CSS 實作
起手式
@import url('https://fonts.googleapis.com/css2?family=Roboto:wght@100;700&display=swap');
* {
    box-sizing: border-box;
}

body {
    background-color: #296ca8;
    color: #fff;
    font-family: 'Roboto', sans-serif;
    display: flex;
    flex-direction: column;
    align-items: center;
    justify-content: center;
    min-height: 100vh;
    margin: 0;
    padding-bottom: 100px;
}
每篇文章產生的樣式
數字的絕對定位需要記住,往左上偏移所以是(-15px,-15px),再使用flex定位在圓圈中間。
.post {

  /* post 使用相對定位,number 才可以絕對定位在這個元素上 */
  position: relative;
  background-color: #4992d3;
  box-shadow: 0 2px 4px rgba(0, 0, 0, 0.3);
  border-radius: 3px;
  padding: 20px;
  margin: 40px 0;
  display: flex;
  width: 80vw;
  max-width: 800px;
}

.post .post-title {
  margin: 0;
}

.post .post-body {
  margin: 15px 0 0;
  line-height: 1.3;
}

.post .post-info {
  margin-left: 20px;
}

.post .number {

  /* 絕對定位 */
  position: absolute;
  top: -15px;
  left: -15px;
  font-size: 15px;

  /* 圓圈的寬高為 40px,radius 圓角為 50% */
  width: 40px;
  height: 40px;
  border-radius: 50%;
  background: #fff;
  color: #296ca8;

  /* 絕對定位到白色圓圈中間 */
  display: flex;
  align-items: center;
  justify-content: center;
  padding: 7px 10px;
}
Loading 動畫設定
一開始設定opacity: 0不要出現, .show 用 JS 動態控制。
position: fixed,是針對視窗做定位,和 absolute 很像,運用在蓋板廣告較多。
:nth-of-type(2),選擇第二個元素,它與第三個元素秒數不同,來形成特殊動畫效果。
.loader {
  opacity: 0;
  display: flex;
  position: fixed;
  bottom: 50px;
  transition: opacity 0.3s ease-in;
}

.loader.show {
  opacity: 1;
}

.circle {
  background-color: #fff;
  width: 10px;
  height: 10px;
  border-radius: 50%;
  margin: 5px;
  animation: bounce 0.5s ease-in infinite;
}

/* 不規則跳動的動畫時間 */
.circle:nth-of-type(2) {
  animation-delay: 0.1s;
}

.circle:nth-of-type(3) {
  animation-delay: 0.2s;
}

/* 小圓點跳動的動畫高度 */
@keyframes bounce {
  0%,
  100% {
    transform: translateY(0);
  }

  50% {
    transform: translateY(-10px);
  }
}
JS 實作
宣告變數
JS
const postsContainer = document.getElementById("posts-container");
const loading = document.querySelector(".loader");
const filter = document.getElementById("filter");

//設定全域變數 global vaiable
let limit = 3; //一次顯示幾篇文章
let page = 1; //預設第一頁
jQuery
$("#posts-container")
$("#loader")
$("#filter")

let limit = 3;
let page = 1;
載入文章資料庫
到 json placeholder 獲取 json api
利用網址的方式取得,再利用網址分析。

- ?_limit=3 只顯示三篇文章

- ?_limit=3&_page=2

解說 getPosts() showPosts()
async 非同步
在 ES7 裡頭 async 的本質是 promise 的語法, 只要 function 標記為 async,就表示裡頭可以撰寫 await 的同步語法,而 await 顧名思義就是「等待」。
因為 fetch 最後回傳的是 promise,透過 async 和 await 操作是最適合的。
取得 JSON 格式的連結,透過 fetch 的 json() 方法處理檔案,就可以顯示出我們要的內容。
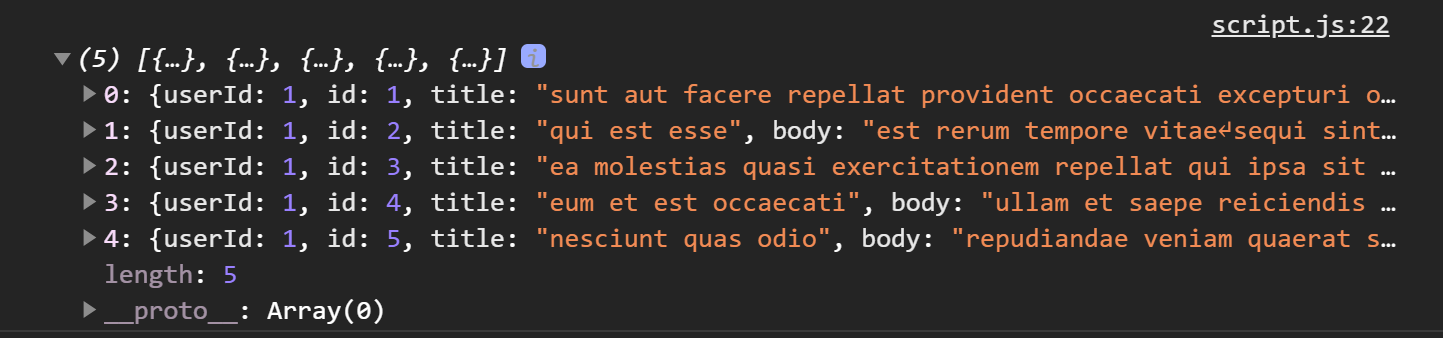
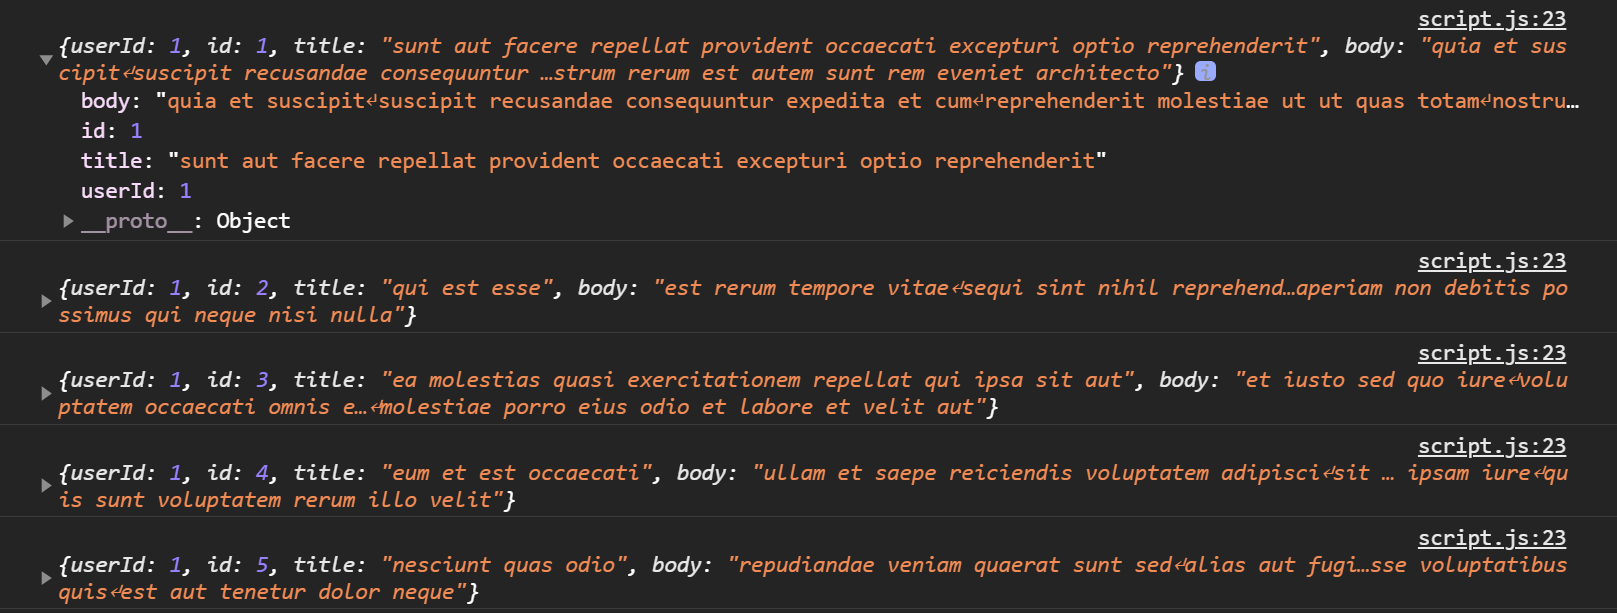
posts 裡面存放了我們取得的需要要的資料,而post是取出來的一筆筆資料。
可以利用開發者工具看出來他們資料的差異。
posts
post
JS
// Fetch posts from API
async function getPosts() {
  const res = await fetch(
    `https://jsonplaceholder.typicode.com/posts?_limit=${limit}&_page=${page}`
  );

  const data = await res.json();

  return data;
}

//Show posts in DOM
// async 採取非同步,把取得的 posts 接在 DOM 裡的 post 區域
async function showPosts() {
  const posts = await getPosts();

//取得資料後,使用 forEach,讀取每一筆資料
  posts.forEach((post) => {
    const postEl = document.createElement("div");
    postEl.classList.add("post");
    postEl.innerHTML = `
      <div class="number">${post.id}</div>
      <div class="post-info">
        <h2 class="post-title">${post.title}</h2>
        <p class="post-body">${post.body}</p>
      </div>
    `;

    //將讀取到的資料接在 postsContainer 裡
    postsContainer.appendChild(postEl);
  });
}

//Show initial posts
//呼叫函式
showPosts();
jQuery
使用$.ajax,使用 get 方法,再利用 $.each 讀取每一個值。
async function getPosts() {}轉成$.ajax({})posts.forEach((post) => {}轉成$.each(data, function (index, post) {}
.each()是用來遍歷選擇的元素們,
可以用在陣列與物件。陣列裡,它會回傳 index 和 array value。
陣列(這邊使用到的方法)
$.each([ 52, 97 ], function( index, value ) {
  alert( index + ": " + value );
});

// 0: 52
// 1: 97
物件
var obj = {
  "flammable": "inflammable",
  "duh": "no duh"
};
$.each( obj, function( key, value ) {
  alert( key + ": " + value );
});

// flammable: inflammable
// duh: no duh
此部分的 code
let limit = 5;
let page = 1;

function showPosts() {
  $.ajax({
    url: `https://jsonplaceholder.typicode.com/posts?_limit=${limit}&_page=${page}`,
    method: "get",
    dataType: "json",
    success: function (data) {

      $.each(data, function (index, post) {
        const postEl = $("<div>").addClass("post");
        postEl.html(`
        <div class="number">${post.id}</div>
        <div class="post-info">
          <h2 class="post-title">${post.title}</h2>
          <p class="post-body">${post.body}</p>
        </div>
      `);
        $("#posts-container").append(postEl);
      });
    },
  });
}
事件監聽當畫面到底時,增加其他的文章
解說 showLoading() addEventListener
這邊利用了setTimeout()非同步方法,Loading 動畫先跑1秒,跑完後花 0.3 秒跑出文章。
window.addEventListener,這邊監聽的是整個網頁的滾動,所以要使用到 window 的 scroll。
關於如何計算內容底端距離捲軸底端的距離,在另外一篇筆記解說。
JS
// Show loader & fetch more posts
function showLoading() {
  loading.classList.add("show");

  //持續 1000 毫秒( 1 秒)後,去除 .show ( loading 動畫)
  setTimeout(() => {
    loading.classList.remove("show");

    // 將 let limit 改為 = 5; 一次只會產生五個 posts
    // 300 毫秒( 0.3 秒)後 page+1 (下一頁產生五個 posts )
    setTimeout(() => {
      page++;
      showPosts();
    }, 300);
  }, 1000);
}

window.addEventListener("scroll", () => {

  // 將三種方法做變數指派
  const { scrollTop, scrollHeight, clientHeight } = document.documentElement;

  // scrollTop 是顯示從最上方到滑到的位置的距離
  // clientHeight 回傳元素內部高度
  // scrollHeight 是 posts 的 height
  if (scrollTop + clientHeight >= scrollHeight - 5) {
    showLoading();
  }
});
jQuery
loading.classList.add("show")轉成$(".loader").addClass("show")loading.classList.remove("show")轉成$(".loader").removeClass("show")window.addEventListener("scroll", () => {}轉成$(window).scroll(function () {}
以下三種轉法很重要,需要記住!
- scrollTop 轉成
$(document).scrollTop() - clientHeight 轉成
$(window).height() - scrollHeight 轉成
$(document).height()
function showLoading() {
  $(".loader").addClass("show");
  setTimeout(() => {
    $(".loader").removeClass("show");
    setTimeout(() => {
      page++;
      showPosts();
    }, 300);
  }, 1000);
}

$(window).scroll(function () {
  if ($(document).scrollTop() + $(window).height() > $(document).height() - 5) {
    showLoading();
  }
});
內文搜尋
解說 filterPosts()
使用者輸入的內容轉換成大寫或全部小寫判斷都可以,然後取的每一個post,再來驗證 title 跟 body 有沒有符合的,如果有 indexOf 就會從 0 開始遞增,然後執行 flex,所以判斷才會是 >-1。
addEventListener 裡的 input ,只要一輸入就會執行 filterPosts,不需要等到按下 Enter。
JS
// Filter posts by input
function filterPosts(e) {
  // 將使用者輸入的內容轉換成大寫
  const term = e.target.value.toUpperCase();
  // 取得每一個 .post
  const posts = document.querySelectorAll(".post");

  posts.forEach((post) => {
  // 標題與內容都要被搜尋到
    const title = post.querySelector(".post-title").innerText.toUpperCase();
    const body = post.querySelector(".post-body").innerText.toUpperCase();
  // 判斷有無找到內容
  // 如果輸入的內容 (term) 在 title 以及 body 裡大於 -1 代表有找到,則顯示 (flex)
  // 沒有則不顯示 (none)
    if (title.indexOf(term) > -1 || body.indexOf(term) > -1) {
      post.style.display = "flex";
    } else {
      post.style.display = "none";
    }
  });
}

// input 裡有輸入文字,就開始過濾,不需要
filter.addEventListener("input", filterPosts);
jQuery
const term = e.target.value.toUpperCase()轉成const term = $("input").val().toLowerCase()$(.post:contains(’${term}’)).css("display", "flex")filter.addEventListener("input", filterPosts)轉成$("input").on("input", function () { filterPosts() });
$(.post:contains(’${term}’)),這行的 jQuery 轉換的寫法是參考別人的寫法,因為原生的寫法太複雜,研究了許久還是無法正確轉換,後來發現 jQuery 有 :contains 這個功能,簡化了許多原生 JS 步驟,值得紀錄。
function filterPosts() {
  const term = $("input").val().toLowerCase();
  $(".post").css("display", "none");
  $(`.post:contains('${term}')`).css("display", "flex");
}

$("input").on("input", function () {
  filterPosts();
});
參考文章
Comments
Join the discussionNo comments yet. Be the first to comment.

